AI is changing the game, and it’s happening right now. If you’re working with Salesforce, you’ve got two choices: jump on the AI train or watch as others do cool stuff with it. Today, I’m here to show you an easy way to get started with Salesforce ChatGPT integration. This is your chance to add some AI magic to your Salesforce projects. Let’s dive in and see how you can make your Salesforce apps smarter and your work a bit more fun.
OpenAI Account for Salesforce ChatGPT Integration
Let’s start at the beginning. The first step is to make an OpenAI account. Just go to the OpenAI website and sign up. Once your account is all set up, here’s what you’ll find when you log in for the first time:

Select API option.
API Key
Now you’ll need to create a new API Key. Head over to the API Keys Tab on the left
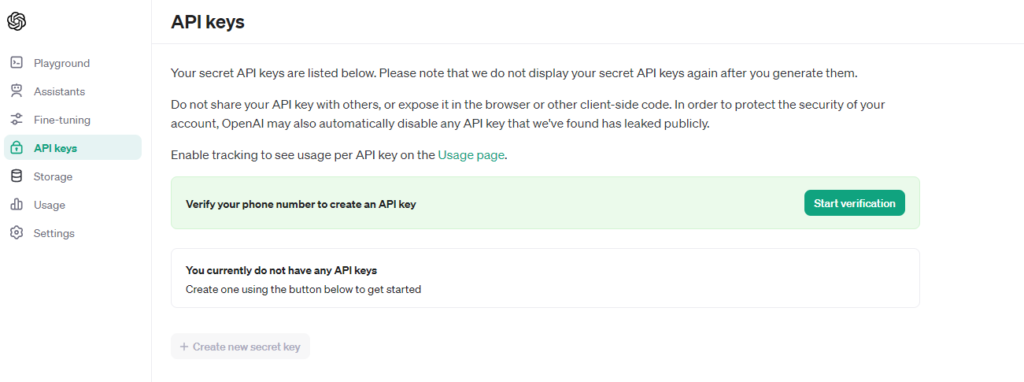
Authorize your phone and click on Create new secret key. Make sure you copy the API key as you won’t be able to see this key again. If you forget your key, create a new one and delete the old one.
Now we have the API key. It’s time to start coding in apex for Salesforce ChatGPT Integration.
Salesforce ChatGPT Integration Apex Code
public class GPTIntegration {
    public static String openAIAPIHit() {
        String ENDPOINT_URL = 'https://api.openai.com/v1/chat/completions?';
        String API_KEY = 'API_KEY';
        String userMessage = 'Make a Story of a magic horse';
        String prompt = 'You are a Storyteller. You create Story like it is 1800s';
        HttpRequest request = new HttpRequest();
        request.setEndpoint(ENDPOINT_URL);
        request.setMethod('POST');
        request.setHeader('Content-Type', 'application/json');
        request.setHeader('Authorization', 'Bearer ' + API_KEY);
        request.setTimeout(120000);

        // Construct the user message
        Map<String, Object> userMessageMap =
        new Map<String, Object>{'role' => 'user','content' => userMessage  };

        // Construct the prompt message
        Map<String, Object> promptMessageMap = new Map<String, Object>{
            'role' => 'system',
            'content' => prompt
        };

        // Construct the messages list
        List<Object> messages = new List<Object>{userMessageMap,promptMessageMap};

        // Prepare the request body
        Map<String, Object> requestBody = new Map<String, Object>{
            'messages' => messages,
            'model' => 'gpt-4-turbo-preview' // Specify the model version
        };

        request.setBody(JSON.serialize(requestBody));
        try {
            Http http = new Http();
            HttpResponse response = http.send(request);
            if (response.getStatusCode() == 200) {
                Map<String, Object> result =
                (Map<String, Object>) JSON.deserializeUntyped(response.getBody());
                if (result.containsKey('choices')) {
                    List<Object> choices = (List<Object>) result.get('choices');
                    if (!choices.isEmpty()) {
                        Map<String, Object> choice =
                        (Map<String, Object>) choices.get(0);
                        Map<String, Object> message =
                        (Map<String, Object>) choice.get('message');
                        String outSOQL = (String) message.get('content');
                        return outSOQL;
                    }
                }
            } else {
                System.debug('Error--'+response.getBody());
            }
        } catch (Exception e) {
            System.debug('Error: '+ e.getMessage());
        }
        return '';
    }
}
Interesting Read: Relay Events from Salesforce to AWS guide
Here’s a breakdown of what the code does, step by step, in an easy-to-understand manner:
- Setting Up API Details: The code begins by defining three crucial pieces of information needed to make a request to the OpenAI API:
- ENDPOINT_URL: This is the URL of the OpenAI API endpoint that processes chat completions.
- API_KEY: This is the secret key you receive from OpenAI when you create an API account. It’s used to authenticate your requests.
- userMessage: This represents the input from the user, which in this case is a request to create a story about a magic horse.
- Creating a Prompt: The prompt variable is set to instruct the ChatGPT model to generate a story in the style of the 1800s. This guides the model on how to frame its response.
- HttpRequest Setup: An instance of HttpRequest is created to configure the request to the OpenAI API. This includes setting the request method to POST, adding necessary headers (like Content-Type and Authorization with the API key), and setting a timeout.
- Preparing the Request Body: The code constructs the body of the request, which includes:
- The userMessage and the prompt, each wrapped in a map with a role (either ‘user‘ or ‘assistant‘) and content (the actual text). These maps are added to a list called messages.
- The model to use, specified as gpt-4-turbo-preview. This indicates which version of the ChatGPT model should process the request.
- Sending the Request: The request body is serialized to JSON and set as the body of the HttpRequest instance. The code then attempts to send the request using Salesforce’s Http class. If the request is successful (indicated by a 200 status code), the response is parsed to extract the generated content. If there are any errors (like a non-200 status code or an exception), they are logged using System.debug.
- Handling the Response: The code checks if the response includes choices (the generated responses by the model). If so, it extracts the content of the first choice and returns it. If there are no choices or an error occurs, an empty string is returned.
This example shows how to interact with an ChatGPT APIs from within Salesforce, a Salesforce ChatGPT Integration. Showcasing the ability to power Salesforce applications with AI-generated content. This can be especially useful for applications requiring dynamic text generation based on user input or specific prompts. Make sure you add OpenAI site in remote site settings.
I think for a start, this would do. Do it yourself and see the power of AI. If you still have any queries, ping me on LinkedIn.



Leave a Comment